Where have we been?

August 23rd, 2009

I know we’ve been incommunicado for over a year now, but it’s because we’ve been crazy busy planning for an addition to the Old Man along with a restoration of the existing part of the house (consisting mainly of fixing the plaster and stripping/refinishing the woodwork). Well, we actually started work in the beginning of July after spending a year working with our architect on the exact plans of the addition (featuring a big new kitchen!).

Anyway, we probably spent the most time trying to find the right contractor after reading the horrifying saga that the folks over at Casa Decrepit had with Willson/Bailey. We were scared to death to wind up with another Scott Bailey! Well, we think we found the right contractor and now we’re about six weeks in and couldn’t be happier with how things are going. I’ll likely publish the occasional picture here of what’s going on, but don’t have time to blog a whole lot as we need to strip the woodwork!

The End

Foaming at the Basement

February 27th, 2008

Our umpteenth winter storm this year prevented the guys from coming yesterday to finish the insulation job, so they came today. The bulk of their time was spent prepping as they covered the basement in plastic sheeting. They applied open cell foam in the basement which is very different from the closed cell foam they put in the attic. The open cell foam is lighter, much, much to cut, tear, fold, spindle, and mutilate. It’s also a lot less sticky–it’s remarkably like angel food cake (no, I didn’t taste it).

They covered the furnace with sheeting, so I turned the heat off and kept an eye on the thermostat to see how the house reacted. Before having the attic insulated, on a day like today (20 degrees out and windy), it would take about 50 minutes for the temperature to go from 66 to 62. In our post-attic-insulated world, it took almost four and a half hours for the first floor temp to drop from 66 to 62, and the second floor thermostat still read 64. When they were done, I turned the heat back on and the house was back to 66 in about 90 minutes.

So clearly you can see why I’m so excited about this whole insulation thing.

There’s not a whole lot to see with foam injection–just the same wall that was there before, but with holes in it. However, looking up into the balloon framing, you can see the insulation (and lack thereof). Here are some before and after photos:

Before:

After:

I managed to get some really cool video of both the closed-cell foam and the open-cell foam being applied, and I’ll try to post those in the next few days.

So, after having gotten six separate quotes for fiberglass, cellulose, and foam, I chose Innovative Insulation Solutions to do the job, and I couldn’t be happier with the work they did. Martin and Mike are the guys who did the basement (Martin was one of the four who did the attic), and they all did a fantastic job–they took their work seriously, but were exceptionally friendly and very patiently answered my (many many) questions. There’s nothing better than contractors who are willing to talk to you about what they’re doing to your house. Here are Mike and Martin standing out front after another day in the foam mines:

If you need insulation and you live near area code 847, give Innovative a call.

The End

The Sweet Sound of Insulation

February 25th, 2008

I haven’t blogged anything about this yet, but M. and I spent November and December gathering quotes from various insulation contractors. The Old Man has somehow survived 96 years with pretty much zero insulation, and after our energy audit we got this fall (which we failed *miserably* I might add), we decided it was time to act.

We started with installers who did blown fiberglass but after some research realized that that was pointless. We found a contractor who did sprayed cellulose, but not only could he not spray the ceiling of our attic (the roof deck), but his quote was *ludicrously* high–on the order of 10 times the cost of the fiberglass. We finally found an insulation contractor who deals exclusively in sprayed polyester foam–both closed and open cell. and decided to pull the trigger on January 10th, but it took us another five weeks of work to prepare for them. Attic work included clearing old storm windows and doors out of the attic, disassembling and removing the Big Red Fan of Death (A truly sad day indeed!). Basement prep included removing the perimeter wall of concrete block in the front of the basement (more on that in a separate post), the old unused bathroom walls in the basement, the old panelled wall behind the washer and dryer, and finally, moving all of our storage and stuff away from the basement walls so that they could have access for injecting the foam insulation.

After some discussion and research, we decided to go with 5″ of closed cell foam in the attic (hooray for 2x6s) and 3.5″ of open cell foam in the basement walls in an effort to seal up the balloon framing from pouring cold air from the outside walls of the house into the basement, which keeps it a frigid 12-20 degrees cooler than the first floor (and makes for some cold toes when you’re roaming around the first floor).

So today, we had the attic insulated. I cannot believe that we’ve lived here for three years without having this done. Our thermostat is set at 67 as I type this, and this usually resulted (in sub-freezing weather) in a cool second floor, a chilled first floor, and an attic that was about 30 degrees above the outside temperature (which meant that we were leaking a *ton* of heating into the outside air). We could have turned the heat up higher to keep the house comfy, but that would have been a colossal waste of energy.

In our post insulation world, the attic is 69 degrees, the second floor is 68, and the first floor is 67… and the entire house (with the exception of the breakfast room, which is a 1960’s addition off of the kitchen over a crawl space) is cozy. I can’t even begin to explain how awesome it is.

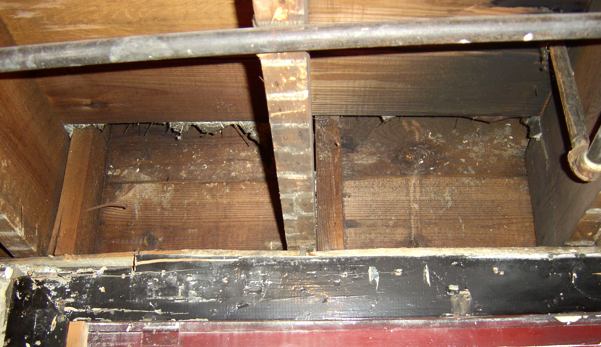
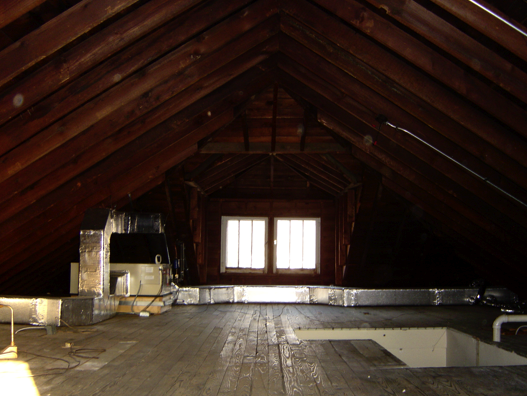
But enough blathering. Here are two pics before (looking dull and gloomy):

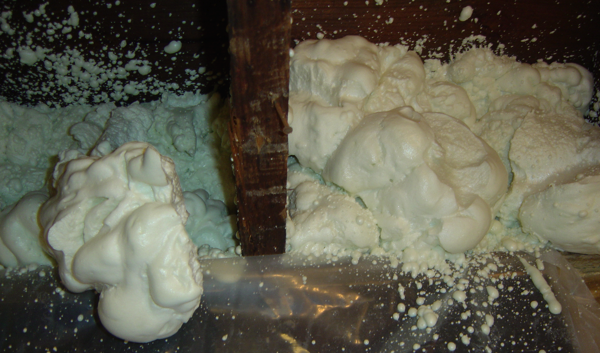
and after, looking like a poorly stuccoed Swiss Chalet:

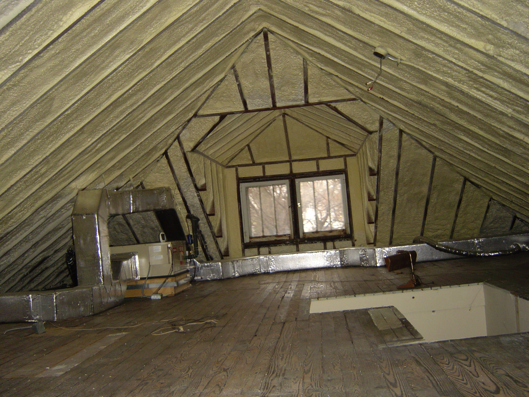
It’s beautiful, isn’t it? And one extra bonus: the house is even quieter than it used to be. Lovely. Worth every penny. I’ll try and get more pics (and some video of the insulation going up!) posted soon.

The End

Railing pictures

February 17th, 2008

Back in June of last year, I blogged about installing railingsfrom the first floor to the second, but I never posted pictures. In keeping with my “better late than never” motto, here they are:

The lower part of the stairs, before:

and after:

The upper part, before:

and after:

Detail of the brackets (looking up):

and detail of the finish:

The railings are red oak from Home Depot, but I stained them with Old Masters “American Walnut” wiping stain, which gave me a nice dark warm color (as opposed to the “Natural Walnut” which looks too green for my liking). I finished it off with four or five coats of 2# cut amber shellac. Some may consider my use of four brackets for each railing a bit excessive, but I hate loose railings with a passion!

The End

Caulkup Cockup

January 2nd, 2008

While it’s usually not worth it for your average homeowner to shell out the big bucks for a high-quality professional grade tool, other times it’s not worth it not to shell out for a high-quality tool. You’ll save (or overspend) hundreds or even thousands of dollars if you can’t figure out when it’s appropriate to be frugal or shell out the cash. I’ll save you the trouble in this case and summarize this post as follows:

Don’t ever buy a cheap caulk gun.

I did, and since the Old Man has many different cracks and crevices that need caulking (especially the windows), and I just about broke my hand after running through 3-4 tubes of caulk. I finally said to hell with it and tossed my $3.50 Home Depot special into the trash and bought a $14 caulk gun at my local paint store. Take a look at the difference:


The most obvious difference is the fact tha the trigger handle is almost 2 inches longer, the plunger has a grabby rubber gasket on it, and overall, it makes caulking about ten times easier than with the crappy gun.

So all of you housebloggers out there who have crappy caulk guns: Buy yourself a new caulk gun for the new year. You won’t regret it.

The End

Do or Blog, Do or Blog…

November 27th, 2007

Since June, I’ve been actually doing things at the Old Man. I’ve got pictures, and I’ve got stories squirreled away in my wee little brain, but I just haven’t had the time to commit them to electrons. Hopefully I’ll get some time to talk about some of the fun stuff that’s been happening around here like:

  • Upgrading from 100 Amp to 200 Amp service
  • Running 3 new circuits to the 2nd floor and a 4th to the attic for future expansion
  • Demolishing some of the concrete block in the basement
  • Demolishing the basement bathroom
  • Removing the “fireplace” around the basement radiator
  • Disconnecting (but not getting rid of!) The Big Red Fan of Death

Anyway, I’ll try to make time for some writing here.

The End

Standards? Who needs ’em

June 12th, 2007

I’m in the process of putting a railing in the stairwell from the first floor to the second floor. First step is to pop a chalk line to get the height of each of the brackets just right–no problems there.

Second step is finding studs through lath, plaster, and 1/8″ oak panelling (the 40’s kind, not the 70’s kind). Nothing but problems there–even the fancy schmancy Zircon studfinder is confused by that much thickness. And the best part? I managed to find a grand total of three studs in the internal wall that faces the bathroom (which is a wet wall). One is 16.5″ on center, another 13″ on center. Fun, fun, fun!

Fortunately, the balloon frame studs are almost exactly 16″ on center, so getting the brackets up on the outside wall took no time at all.

After all this rigamarole, cutting, staining, and shellacking the railings themselves should be a piece of cake.

The End

The Maintenance Catches Up

February 19th, 2007

After living in the Old Man for over two years virtually maintenance free (quite impressive, actually), it caught up with us in December. First it was the leaky roof, which Nyberg Exteriors repaired for us.

A week later while making a trip to the basement I discovered a small puddle on the floor which turned out to be a pinhole leak in one of the ancient galvanized pipes. Fortunately, American Vintage Home showed up in less than 90 minutes to fix it, but the fix took more than half a day since the leak was, of course, in the most hard to work location of the water system.

Less than a week later we had a different repairman out from American Vintage Home to take a look at our main furnace which was overpressuring to 30psi, tripping the overflow valve and creating another puddle on the basement floor. Fortunately, it was just a waterlogged expansion tank, but since our hot water radiator system doesn’t have a single shutoff, it took some creative draining to drain the expansion tank without draining the entire system.

So that was December. It’s now mid-February and today was our first day above freezing in twenty-two days. Fortunately, the Old Man deals with the cold weather well enough (ignoring, if you will, the lack of insulation).

The End