


Birdfeeder Photos
Monday, June 5th, 2006Here are the pictures of the birdfeeder that I hung over the weekend. Unfortunately, the birds didn’t want to hang around to get their picture taken.


Here are the pictures of the birdfeeder that I hung over the weekend. Unfortunately, the birds didn’t want to hang around to get their picture taken.
I had tons of stuff to do around the Old Man this weekend, so of course, I blew it all off and decided to put up a bird feeder in the backyard.
I started my adventures by visiting the local pet store, which had a single plastic cheapo bird feeder. Disappointed, I headed over to “PetSmart”–my first ever visit to a huge big-box pet superstore, and I have to confess that I was a bit freaked out by the gargantan selection of stuff that people can blow cash on for pets.
I joined the fray by buying an 18″ tall Stokes Giant Combo Bird Feeder, which I thought would look quite pretty in our yard, along with a 30 pound bag of birdseed. But when I asked a salesperson about something to hang the feeder I got nothing more than a dull stare and a mumbled “Idontthinkwesellthatstuff”. Not to be deterred, I just whipped throught the Home Depot on my way back to the Old Man and bought a 7 foot tall “Shepherd’s Hook” to hang the feeder on.
I got home, stuck the hook into the ground at the edge of the back patio, hung the feeder on and realized that I had a problem. The “crook” of the hook stood about 5’8″ off the ground. That means that the feeder itself stood whopping 4’2″ off the ground, which made it more than easily accessible to the dozen or so squirrels that frequent our backyard. On top of that, the feeder weighs probably 5 pounds empty and holds 12 pounds of seed, and that resulted in one very wobbly shepherds hook. The whole thing looked kind of silly, actually.
I decided that The Right Way to do this was to hang the feeder from one of the tree branches. This would place the feeder at the edge of the patio (good), over 10 feet from the tree (better), and more than 15 feet from the house (best). I figured that this would allow me to hang the feeder at least eight feet off the ground.
The biggest problem that I faced was the fact that the tree branch in question was about 30 feet off the ground, and how was I going to get a loop of cable over it? Before going to the hardware store and buying the equipment I needed, I decided to do a proof of concept test and see if I could get some string over the branch somehow. Despite the fact that I’m a lousy throw, I managed to get a ball of string over the branch in 4 tries. I needed to figure out how much cable to buy, so I marked the string at eye level, tied a knot into it, and pulled the knot up to the branch. I made another mark on the string and then measured the length: 26 feet, so I needed to purchase 54 feet of cable (tossing in an extra two feet for good measure).
so I headed to the hardware store to buy:
I came home and laid the cable out in a long U and found the midpoint of the cable. I cut the heater hose in half, and cut a strip out of one half of the length of the hose–this allowed me to stuff the cut hose inside of the uncut hose, giving me a double thickness hose to use as a saddle over the branch. I threaded the cable through my modified hose to the midpoint and taped it on with duct tape (just to hold it until I got the cable mounted on the branch). I then taped one end of the cable to one end of the string that still dangled from the branch and pulled the cable up and over the branch. A little fiddling gave me my cable hanging from the branch above with the hose saddle on top of the branch.
I got out my big ladder, climbed up and about 9′ off the ground created a loop on one end of the cable by binding it to itself with the three 1/8″ rope clips. I then bound that end of the cable to the dangling end of the cable with the 3/16″ rope clips and tightened the clips as far as they would go with my socket wrench. The only thing left was to cut the extra cable off, and since I had no wire cutters that would work through a 1/8″ stranded steel cable, I pulled out my Dremel tool and a few cut-off wheels and sawed off the excess cable. Ten pounds of birdseed later and I had the feeder hanging. I’m really happy with the way it looks, and since it’s so high off the ground, it’s just the right height for birdwatching from the breakfast room. Sunday morning during breakfast, we saw some of our local finches helping themselves to the feed, and although a number of them seemed somewhat leery of the new feeder, the local cardinals knew just what to do. I’ll try and post a picture sometime this week.
Now one of the reasons I hung the feeder as high as I did is that I’m hoping to discourage the squirrels from trying to eat the birdseed. Given the height off the ground and the distance from the tree, I don’t see how a squirrel could jump to it–if it missed its target, it would surely break its neck when it hit the ground. Their only real chance is to make their way down the cable somehow. I know from several friends that there’s no way to create a totally squirrel-proof bird feeder, but since our next-door neighbor feeds the squirrels several handfuls of peanuts everyday, I’m hoping that that keeps them fat and happy and content to not muck about with my birdfeeder. In any case, given how overengineered my cable is, I could always dispense with the bird feeder and hang a tire swing from it. 🙂
Now about that stuff that I was supposed to be doing this weekend…
I hate fluorescent lighting. I mean really hate fluorescent lighting. I’ve often gone off on lengthy rants to my friends and family, blaming fluorescent lights for the evils of the world. My wife, M., has had to endure this ranting numerous times.
So when I told her that I was going to Home Depot this morning to buy two fluorescent lights for my basement workshop, you could have knocked her over with a feather.
What inspired this change in heart? Allow me to ‘splain:
First, when Noel installed fluorescents in the basement of Casa Decrepit, I was inspired to get off my duff and seek out a better lighting solution for my basement workshop.
Second, when my employer moved into a new office 6 months ago, I was surrounded by fluorescent lights, and there wasn’t a switch anywhere to turn them off. I felt totally trapped and immediately began to plot out ways to cover my cubicle with tent material to block out the nasty fluorescent ickiness. However, after a week, I noticed, or more to the point, I didn’t notice any of the three things that I hate about fluorescents:
What was it about the fluorescents in my new office that made them different? After doing a little research, I discovered that some advances in fluorescent technology have been made in the past few years that make them suck less. New “electronic” ballasts eliminate the hum and the flicker (and can even be “instant-on”), and newer bulbs emit light that is much closer to the warm yellowy-red light of incandescent bulbs.
Quick note about bulbs: Most fluorescents that you find in office buildings have a color temperature of 4500 degrees which feels cold and weird to me (did I mention that they suck the life out of you? Good. Just checking). The bulbs that I got are rated at a much cozier 3000 degrees. This makes me feel more like I’m in my home and less like I’m in prepping for an alien autopsy.
Anyway.
I went to Home Depot this morning and bought 2 “Lithonia Lighting 1 x 4 Ft. 2-Lamp Fluorescent Shop Lights (T-8)” and 4 T-8 48″ bulbs. It took a only few moments to assemble them, hang them from hooks I put into the subfloor between the rafters, and plug them into the incandescent fixtures’ outlets above my workbench. I plan on hard-wiring them in later, but for now, it’s like daylight in my workshop, and I love my new lights. M. even likes them! She asked me to install one over the washer and dryer in the basement.
And that’s how I came to install fluorescent lights in the basement of The Old Man. Am I ready to install them upstairs in my living area? I wouldn’t go quite that far. Let’s just stick with the basement for now.
After a 12 month marathon, culminating in having the family over for Thanksgiving dinner, we took four months off from working on The Old Man, mostly to save our sanity and keep us from growing to hate The Old Man.
Well, for the first time in four months, we did some work around the house today. The warm weather sent M. out into the yard to do combat with the dandelions growing in the lawn. After clearing out my workshop a few weeks ago, I finally created a bottom shelf for my workbench out of the old plexiglass that was in the front door (more to come in a future post about the new (beautiful!) bevelled glass that we’ve got in the front door). I found some weatherstripping and a door “sweep” when cleaning up in the basement and installed them on the basement door to the yard in the hopes of stemming the pile of leaves that seems to keep blowing under the door and into my workshop.
We’ve put together a plan for what needs to be done this year, and it’s about time that we got started executing on some of the smaller items:
That’s just a few of the little things we need to get done. Now for the bigger things:
I think that should keep us busy for a while.
I’m swamped. In the last three months, I’ve been busy knocking out dozens of small projects around the Old Man:
Combined with the fact that work has been crazy busy, I’ve had no time to blog. Hopefully, now that our big family get-together is over, I’ll have some more time to tell a few stories about some of the more interesting activities around the Old Man.
Our plan is to take the month of December off from working on the Old Man and just enjoy him for a bit before we burn ourselves out entirely. It’s really nice to just sit back and enjoy the fruits of our labor.
Last week, Cy from A1 Tree service came over and trimmed our trees. He basically thinned out both the big maple in the front and the HUGE maple in the backyard. We really needed the trees to be trimmed as they’ve both got big scars on their trunks from some long past trauma, and the tree in the backyard is actually hollow near the bottom. The less weight they have on top, the less likely they are to blow over in a storm.
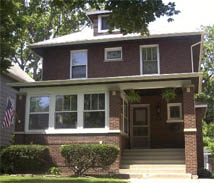
They both look good and allow a lot more light through, but the front tree looks radically different: it’s shaped taller as they removed a lot of the lower branches. In fact, it looks much older now–more regal and stately. And even better, you can see a lot more of the house from the street now since the low-hanging branches are gone.
Perhaps the biggest improvement came not from having our trees trimmed, but from our neighbor to the South having two of her trees cut down (one was right up against her house, the other right up against her garage). The tree in her front yard stood right South of our sunroom, and consequently, it blocked a lot of light to both the sunroom and the living room. It also blocked our view down the block as well as all views of our house from the South end of the block. Now I can see our house from all the way down at the corner! This is a really nice improvement, but it’s going to pay off in spades with additional sunlight in the winter–the sunroom and living room get about twice as much light as they used to.
Lastly, the other tree that she had removed was on the far Southwest end of her property, and we’ve now got tons more light in our backyard.
Yay sunlight!
Andy and his assistant came this morning to remove the stained glass windows and board them up. The two casement windows came out easily as they just had to pull the hinge pins, but the other windows took a bit of work.
When removing old (fixed) stained glass windows, you’ve got basically two paths to take: Remove the glass with the frame intact (disassembling some amount of trim in the process), or remove just the windows by chipping out the old glazing and pushing the window out from the inside. Andy decided to take the latter approach with the foyer window and the two living room windows. While it took some effort to chip out all the old glazing, they got the windows out in one piece. The whole removal process took under two hours, but it took them another hour or two to carefully board up the windows and place the storms back in. M. put some old towels under where they were working, so there was hardly anything to cleanup.
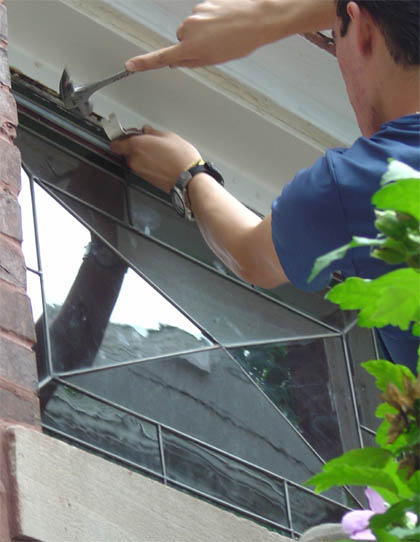
Andy’s assistant removed the old glazing from the outside:

After removing the glazing, they were surprised to discover that the nails holding the window in place were square!
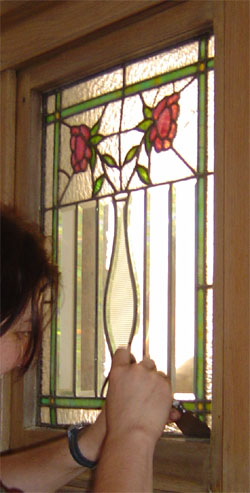
Here’s Andy helping to get the window out from the inside by using a putty knife:
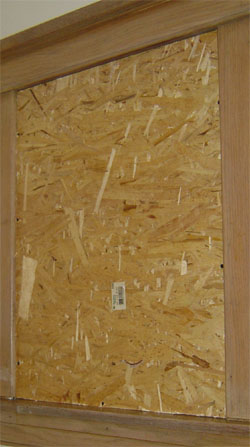
And lastly, the sad-looking boarded-up window:
And here’s Andy’s helper removing the glazing from one of the living room windows. You can really see how badly the window is bowing out by looking at the reflections on the different panes of glass.
So off they went with our windows and now we’re looking forward to living in a cave for a week. If all goes well, they’re coming back next Friday to put the windows back in.
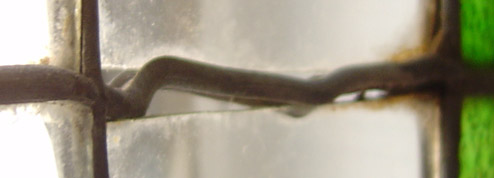
Before we get to the part where they remove the stained glass windows, here are some close-up pictures of what needs to be fixed. First, we’ve got the dining room casement windows whose lead channel is severely warped. Here’s the top of the leftmost window:
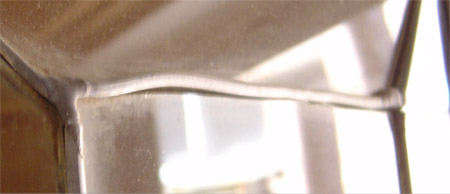
And the middle of the same window:
And lastly, some of the broken glass in the foyer window (Note the glue on the top left crack):

I’m very much looking forward to getting these all fixed up.

You are currently browsing the archives for the Stories category.
| M | T | W | T | F | S | S |
|---|---|---|---|---|---|---|
| « Aug | ||||||
| 1 | 2 | 3 | 4 | 5 | 6 | |
| 7 | 8 | 9 | 10 | 11 | 12 | 13 |
| 14 | 15 | 16 | 17 | 18 | 19 | 20 |
| 21 | 22 | 23 | 24 | 25 | 26 | 27 |
| 28 | 29 | 30 | 31 | |||