Archive for the 'Remuddling' Category

The Basement Wiring

Sunday, March 13th, 2005

Aside from a few outlets with reversed polarity, The Old Man passed the electrical part of our home inspection with flying colors.

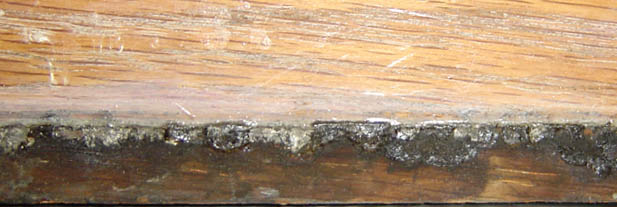
Then, I tore out the basement ceiling and discovered some bits that weren’t up to code:
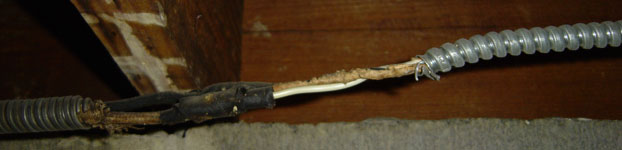
and this:

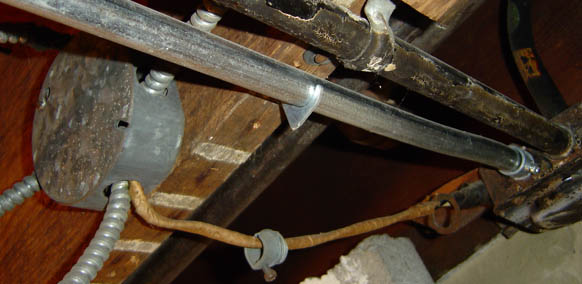
Scary stuff, but liveable until we can get some electricians in–at least it’s not knob and tube.

Before moving in, while using the Shop Vac to clean out the basement, I blew a breaker and only then did I discover that the entire basement was on a single circuit. Again, annoying, but liveable until we can get some electricians in.

After moving in and plugging in a few lamps, the TV, the stereo, etc., we discovered that not only is the entire basement on a single circuit, but that same circuit also feeds the living room, the sun room, the breakfast room, the foyer, and the front porch.

So, on a single 15 amp circuit, we have:

  • First basement flourescent light
  • Second basement flourescent light
  • Third basement flourescent light
  • Fourth basement flourescent light
  • Basement stairwell light (top)
  • Basement stairwell light (bottom)
  • North basement storage room light
  • South basement storage room light
  • West basement closet light
  • East basement area light
  • Basement Light near water heater
  • Basement Light near washer/dryer
  • Basement Light near furnace
  • Basement Light near workbench
  • Old basement shower light
  • Old basement bathroom light
  • South basement outlet
  • North basement outlet
  • First sunroom outlet
  • Second sunroom outlet
  • Third sunroom outlet
  • First Living Room outlet
  • Second Living Room outlet
  • Third Living Room outlet
  • Fourth Living Room outlet
  • Living Room ceiling fan and light
  • First breakfast room outlet
  • Second breakfast room outlet
  • Backyard outlet (outside)
  • Garage outlet (outside)
  • Garage outlet (inside)
  • Garage yard lights (outside)
  • Garage wall light (inside)
  • Foyer light
  • Front porch light

Now I don’t know if you’ve been counting or not, but that’s a grand total of 21 light fixtures and 14 outlets on a single 15 amp circuit. Now I’m no electrician, but that seems a little excessive to me.

Thankfully, tomorrow, our nephew S. and his friend M., who is an electrician, are coming over to start rewiring the basement (And I’m going to help out-at least until they throw me out). Not only are they going to replace all the wiring in the basement, but they’re also going to divide up the 35 endpoints above across 4 or 5 circuits. I’m really looking forward to this!

And now, a gratuitous shot of the old electrical fusebox, which was turned into a giant junction box by a previous electrician:

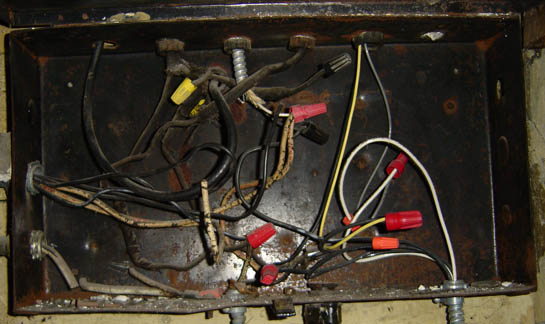
My favorite part is the coax for the cable TV that comes in through the hole in the wall where the electrical service used to enter the house–that’s classy.

The Woodwork

Wednesday, February 16th, 2005

One of the first thing we noticed when we saw the Old Man was the woodwork–it’s beautiful, or at least it was at some point. The entire house is finished with heavy oak trim, and the dining room has oak panelling from the floor to about 18″ below the ceiling. The foyer stairs and the upstairs hallway are also panelled to about waist high (undecorated panels, not actual wainscoting).

This woodwork should provide warmth and beauty to the house, but it doesn’t; this picture of the stair railing gives a good idea of what it looks like now.

From what I can tell, one of the Previous Owners painted the woodwork–all of it–with at least one coat of paint, which was very common after WWII. The crown molding (a very simple molding, mind you) is still painted ceiling white. Then another Previous Owner stripped the woodwork, but did an extremely poor job of it:

They neither removed the shoe between the floor and the trim, they didn’t remove all the stripped finish, and they failed to completely put a new finish on the trim after they stripped it. In fact, if you look at where I removed the shoe, you can see where the old finish pooled up and hardened into a glass-like substance. The result: woodwork with an inconsistent “pickled” finish, raised grain, and the look of weathered driftwood.

So I’ve been doing research to figure out what we’re going to want to do with the wood. We bought a few paint strippers to try out on some test patches. We’re going with ReadiStrip, and CitriStrip for starters, and we’ll try SOYGel if neither of those do the trick.

As for refinishing, we’d like to go with a darker finish to provide a contrast with the floors, which were stained with Colonial Maple. However, we don’t want the finish to look muddy, or plasticky–we want it to look like it was finished 93 years ago and meticulously maintained for the life of the home.

Let’s start with what I’ve ruled out:

Several people recommended that we just use Minwax Polyshades, which apply a stain and a finish in one step. It may be easy to use, but wherever I’ve seen it used, it not only obscures the grain of the wood, but scratches easily, and the scratches stand out because the stain and the finish scratch off together.

I’ve also ruled out polyurethane, because of its plasticky look.

I’m looking for a finish that will highlight the beauty of the wood and give it a nice warm deep glow. At the same time, I’m looking for a stain that will highlight the grain of the wood while darkening the body of the wood without completely blackening it.

So far, all of my research indicates that I’ll want to start with a dye stain, apply a pigment stain over that, and finish with a few coats of shellac followed by a microcrystalline wax.

That sounds like a lot of work.

I’m planning on doing some experimentation on some test pieces of wood before actually trying it on the actual woodwork, but I’m hoping to find the look that I want without too many failed attempts.