Archive for the 'Renovation' Category

It Hides a Multitude of Sins
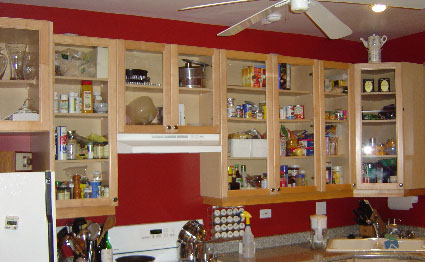
Tuesday, October 25th, 2005

The previous owners of The Old Man put in what I call a “Seller’s Kitchen”: a kitchen whose purpose is primarily to help sell the house. Our kitchen looks nice, but isn’t terribly suited for cooking. In particular, however, once you fill it up full of stuff, it looks rather cluttered since every one of the upper cabinets has a glass door (this picture is from early 2005):


We spent some time investigating ways of opaqueing the doors: Chemical etching was too messy and too hard to get a consistent look. We couldn’t find pieces of nice handmade paper that were 42″ long. After racking our brains for a while, we basically forgot about it and went about our business.

At some point early in 2005, M. discovered Gila film and decided to try coating the window in her bathroom with the “white” (opaque) film–this would allow her to get more light but still have privacy. It worked OK in the bathroom, but because the old window glass wasn’t perfectly smooth, the film shows numerous small (but slightly annoying) imperfections. We shelved the rest of the film and forgot about it until last week.

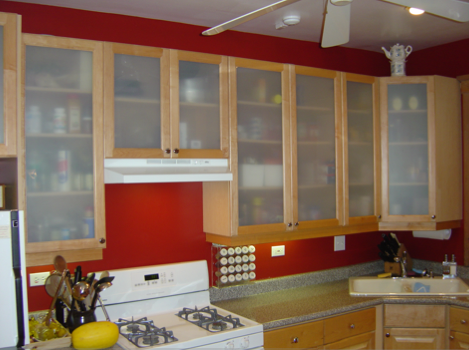
I brought the remaining film up and coated the two cabinet doors above the refrigerator as a sort of a test run, and since the glass in the kitchen cabinets is new (and consequently, perfectly smooth), it looked fantastic! I ran by my home away from home to pick up another roll, and in a few short days, I managed to opaque every cabinet door except the four doors on the cabinets (not shown) that hold our dishes and glassware (which don’t look particularly cluttered).


I have to confess that I shelled out the eight bucks for the “kit” to apply the film, which consists of a spray bottle of soapy water, a couple of cheap hard plastic “squeegees”, and a small razor cutter. The process for applying the film is pretty simple, but takes a little bit of practice.

First, a couple of don’ts: Don’t use Windex or anything containing ammonia to clean the glass–according to the instructions, ammonia dissolved the glue on the film. Also, while you can lay the glass flat to measure and apply and trim the film, stand it up before squeegeeing so that the excess soapy water can drain off the glass.

Start by cleaning the glass with the soapy solution. Scrape off any paint spatters or whatnot with a razor blade. You basically want your glass to be as smooth and clean as possible.

Now measure the glass and cut a piece of film about 2 or 3 inches wider and longer than your piece of glass. I strongly recommend that you don’t try to cut it too close here or you may wind up starting over like I did. Twice.

Separate the film from its backing by applying two pieces of tape over one corner and then quickly pulling them apart. Remove the backing, spraying the film as you go to counteract the static electricity which will make the film not want to cooperate at all.

Thoroughly spray the back side of the film and the glass itself, then position the film on the glass.

Now spray the other side of the film and squeegee the air bubbles out, starting in the center and going left, then right, stopping about two inches from the edge of the glass. Now trim the excess film off.

Spray the film again with the soapy water and give it a thorough squeegeeing. Now dab the glass dry around the edges and you’re done!

I managed to get 10 cabinet doors done in about four hours and we’re thrilled with our kitchen’s new look.

Rewired

Thursday, March 24th, 2005

It took the three of us a total of six days, but the basement, and a good chunk of the first floor are now rewired. We pulled out *all* the old wiring in the basement and installed almost 300 feet of new (EMT) conduit. Despite my getting a horrible cold the second day in, we’re done.

We now have 5 new circuits:

  • Circuit 1 (20A): Rear basement lighting, plus two outlets
  • Circuit 2 (20A): Front basement lighting, plus 4 shop outlets
  • Circuit 3 (20A): 4 outlets in the shop
  • Circuit 4 (15A): Everything on the first floor that used to be on the basement circuit, including the sun room, living room outlets, the foyer, the front porch, and the second floor hallway.
  • Circuit 5 (15A): The sunroom, the backyard outside outlets, and the garage.


Other highlights:

  • The original house wiring is actually in pretty good shape, but it was the hundreds of feet of armored cable that took a lot of work.
  • We put the dining room sconces on the dining room circuit instead of the basement circuit.
  • The old circuit box, which was a total mess, is now half-empty.
  • We found a box almost completely buried in the original wall of the basement. Tsk tsk. (That’s the “before/during/after” picture).
  • The old basement breaker has been completely disconnected.
  • The blank plate in the side of the stairs in the foyer, which housed an empty electrical box that was hooked to nothing, is now the proud home of a brand new 20A socket.
  • The outlet in the dining room, which housed a loosely attached non-functioning outlet with a huge burn mark on one of the grounding holes, has been replaced.
  • We had to demolish a *lot* of stuff: The old basement bathroom ceiling, part of the cinderblock wall in a few places, bits of the original plaster wall in other places. Messy, messy, messy, but I can’t wait to get rid of the rest of the cinderblock.
  • We made a total of nine trips to the Home Depot and the electrical supply house.

Some things that I learned:

  • Always remove the hot wire before the neutral, and connect the neutral before the hot. The neutral wire is your friend.
  • After you throw the breaker, it really pays to make absolutely certain that every wire in the box that you’re working on is dead, or you might wind up dead yourself. One of those pen current detectors (that works right through the insulation) is an invaluable tool.
  • 12 gauge stranded wire is a lot easier to work with than 12 gauge solid wire.
  • When the previous electrician doesn’t tape around the sides of a light switch, you get a lot of sparks when it touches the side of the box as you pull it out.
  • Taping around the sides of light switches and outlets is The Right Thing To Do.
  • Making complex bends in electrical conduit is a pain in the ass.
  • The Gold-Fish is the coolest fish tape ever.
  • If at first you don’t succeed, use a bigger wire nut.
  • Electrical work isn’t as scary as I thought it was, but having patience, taking your time, and having a healthy fear of it don’t hurt.
  • When in doubt, use your multimeter.

Kitchen/Bathroom Before and After Photos

Monday, January 17th, 2005

[[This took place in early-October, but it’s part of my “catching up” on stories about the house that occurred before and after we moved in.]]

As I mentioned many times before here, painting the kitchen was a royal pain in the arse because Behr Autumn Maple covered about as well as orange juice. Oddly enough, the Behr Neptune Blue that we used covered in two coats.

Enough yapping. On to the comparison pics.

More on Vitrolite

Saturday, January 15th, 2005

I mentioned here that the hall bath had likely been redone in the 20’s or 30’s, but according to this article, green Vitrolite wasn’t manufactured until the 30’s. Cool.

Goodbye Pink Tub!

Friday, January 14th, 2005

[[This took place in mid-October, but it’s part of my “catching up” on stories about the house that occurred before and after we moved in.]]

The upstairs hall bath doesn’t have an original bit left in it, however, it does have some rather interesting bits. My best guess combined with some best guesses of a few other people would date the bathroom renovation to the 20’s or 30’s, primarily because the bathroom is encased in green Vitrolite from the floor to about two feet from the ceiling.

Vitrolite is a “pigmented structural glass” that is definitely a bit unusual looking:

Note that the toilet was probably installed in the last 5 years, and the sink seems to have been replaced in the 50’s, and the tile work hails from who-knows when. The tub is a great old cast iron built-in tub, except for one tiny detail. It’s pink:

While we decided that we could wait to replace the toilet and the sink (and eventually, the tile), we wanted to do something about the color of the tub ASAP. Ripping the tub out would have been a gargantuan task, not to mention the fact that it would have required destroying much of the Vitrolite, so we decided to get the tub “re-enameled” white.

The re-enameling process (actually, it’s not enamel at all, but an epoxy) is not only much cheaper than replacing the tub, but can be done by a professional in under half a day. The Tub Guy came out with a roll of tape and a roll of paper and he taped and papered the entire bathroom and most of the hallway to boot. After removing the tub fixtures and taping cups to the faucet and shower head (to catch any drips), he washed the whole tub down with an acid to etch the surface so that the epoxy would bond with it better. Then he sprayed on the epoxy:

He finished his work, cleaned every last bit of mess up, and was gone in about 2 hours. He instructed me not to use the tub until I caulked around it with a good quality silicone caulk, and that I should wait a few days to do the caulking. Since I was so busy with other things, I didn’t get around to caulking the tub until November.

I had heard horror stories about working with silicone caulk–that it was messy and extremely difficult to work with, so I was somewhat reticent to do this job (all of the caulking I’d done in the past was with latex-based caulk, and that cleans up with nothing but water). So after a bit of research, I got my supplies together:

  • 1 Caulk gun
  • 1 Tube of GE Silicone II caulk
  • 1 Roll of blue masking tape
  • 1 latex rubber surgical glove (Super-handy to have around–buy them by the bag!)
  • 1 Roll of paper towel.

I masked off the border of the tub with the blue tape, put the glove on, then caulked each piece of the tub and smoothed the bead with my gloved hand, wiping any excess or mess on a piece of paper towel. After I got all the caulk on and smoothed, I carefully pulled all the tape off, and, holding all the tape and dirty paper towels in my gloved hand, I took the glove off, turning it inside-out so that it encapsulated the tape and paper towel–voila, instant packaged trash. Turns out that it was piece of cake.

Here’s the before and after shots of the caulking job:

And, finally the finished product:

New Back Door

Wednesday, January 5th, 2005

[[This took place in early November, but it’s part of my “catching up” on stories about the house that occurred before and after we moved in.]]

The back door is off of the breakfast room, which is a converted porch–off the kitchen. It’s gently insulated, and several of the windows are so out of whack due to settling that they won’t even close anymore.

So back to the back door.

It’s an old wooden door that’s suffered a fair bit of water damage. The top half is a divided-pane window that’s single-pane and rattly and the screen door on the outside has no closer, doesn’t even come close to sealing, and is held shut by an odd piece of bent metal near the very top. Like the basement ceiling, I took one look at it and said “It’s gotta go.”

We bought a new door and a new screen door at Home Depot. After giving them a $30 deposit (non-refundable, of course) and a $330 estimate, they sent out someone to estimate the cost of installation. Our conversation went something like this:

Guy: “Hmm. This is 82″ by 32”–we’re gonna have to get a custom door for this.

Me: “And how much is that?”

Guy: “Extra $150.”

Me: “Can’t we just frame it down and use a stock 80″ by 32″ door?”

Guy: “Uhhhh. Sure. Yeah. I guess so. But you’re still gonna need a custom door cause your door jamb is 6 1/4″ thick instead of 4 1/2″.”

Me: “Why couldn’t you just use a jamb extension kit?” (Which, incidentally, costs $39).

Guy: “Uhhhh. Sure. Yeah. I guess we could do that.

So he takes a bunch of notes and hits the road. Two days later I get a call from Home Depot telling me that the installation for this $175 door (pre-hung in a frame) and the $99 screen door is going to be

<<drumroll>>

$630

I politely told the person on the line that it was extremely unlikely that I would be paying that much for my installation and that they could forget about ever stepping foot in my house again.

I called up my friend J. and he set me up with his wife’s cousin, The Handyman, who’s the son of a general contractor, and apparently is the household equivalent of MacGyver. Due to scheduling difficulties, he can only come 2 days after we move in–the day that I leave for a week long business trip, so I get our nephew S. to come over and help him install the door. I swear that this trip was planned months ago. Really. Stop smirking, I mean it.

So they rip out the old door, to discover that under the door is… well… nothing. The wood under the door had just rotted away entirely, leaving a big gaping hole. So S. and The Handyman fabricate some framing for the base of the door to sit on, frame down the top, and, after a fair bit of work, get the new door installed, caulked, and fill the rest of the space in the framing with Great Stuff, we now have a new back door. It’s got double pane windows, and seals up just so when you close it. As for Great Stuff, if you own a house and don’t yet have at least one can of it lying around, run out and get some RIGHT NOW. Go ahead, I’ll wait.

The Handyman came back the next weekend to finish putting the outside trim on the door and get the screen door installed, which only took up a few hours, despite the finger-numbing cold weather. As for the screen door installation, I can’t believe that I even considered paying someone to install this thing–it was a total piece of cake. I could have done it myself. If you ever need a new screen door, and you’re not a complete hazard with a toolbox, I strongly recommend installing it yourself.

The inside trim of the back door is new, just like the rest of the trim in the breakfast room–it looks like it was installed in the last year. The finish is poorly applied, and judging by the dozens of nails we had snip off of it, it was installed by someone who enjoyed using a nailgun. Lastly, it’s all red oak, when every last bit of trim in the rest of the house is white oak. Of course.

*sigh*

Over the course of the last few weeks, I sanded the old finish off the trim, filled the nail holes and finished it with a few coats of Tung Oil. I managed to find a can of Hope’s Tung Oil at The Local Neighborhood Paint store, and it’s a fantastic finish. After encountering several different brands of “Tung Oil Finish”, each of which contained remarkably little tung oil, this stuff was amazing–it was like fine maple syrup and left a beautiful finish. I rubbed it down with 0000 steel wool and put on a second coat, which I also rubbed with steel wool. After nailing it back up (and making a trip to the hardware store to buy the right length nails), countersinking the nails, and puttying the holes, it’s the best looking trim in the breakfast room. Not that that’s saying anything–the rest of the trim looks like crap.

Next story from the archives: When Crappy Faucets Go Bad!

Getting to Know the Radiators

Saturday, October 16th, 2004

When I lived in an apartment that had radiator heat, none of the valves worked very well, so we regulated the temperature by opening windows. Now that I’m paying the heating bill, this method of climate control is much less appealing to me.

As I’ve mentioned before, our radiators are hot water radiators, not the more common steam radiators.

Steam radiators use a single pipe that delivers steam up to the radiators and allows the condensed water to drip downward back to the boiler where it’s heated up again. Steam radiator valves pretty much have to be either all the way open or all the way closed, and the amount of steam allowed into the radiator is controlled by a regulator that’s typically on the top of the radiator opposite to the end where the valve is.

Hot water radiators use a one-pipe closed system, and each radiator taps into one or more main ‘loops’ by means of diverter ‘tees’. These tees are called Monoflo Tees, and they have a mechanism inside that restricts the flow of water, causing some of the water in the main loop to go into the radiator, and the rest of it to continue on in the loop.

There are a few really nice things about a hot water radiator system:

  • It’s exceptionally quiet. There’s no banging and clanging like steam radiators make.
  • The radiators are full of hot water, so even after the system kicks off, the hot water in the radiators keeps giving off heat.

The downside to a hot water system is that if you need to replace a valve or a radiator, you need to turn off the boiler and drain the entire system, make your repairs, the refill the system and bleed all the radiators. As I found out, this is an extremely time-consuming thing to do.

Anyway.

Since a few of the radiator valves are frozen, and one is, ahem, broken, our nephew S., who does HVAC work for a living, came over today to replace the radiator valves that don’t work right.

He started off by hooking a hose to the spigot next to the boiler and opened the spigot, draining the system into one of the basement drains. Then he opened the bleeder valves on two radiators upstairs to allow air into the system so that it could drain fully. To my surprise, this took about an hour–I had really expected it to drain more quickly.

We then went to work removing the broken valves. S. had some pretty big pipe wrenches he used to get the valves off. The first three were pretty easy, but the last radiator’s valve was wedged between the radiator and the wall, so we had to unhook the radiator from both ends and move it aside. I’m really glad that this was the smallest radiator in the house, because it took just about all our strength (and S. is a big guy) to move it. I’d guesstimate it weighed about 200 pounds.

We needed to replace two 3/4″ valves and two 1/2″ valves, so we went to Home Depot where we got the first two valves, plus some “pipe dope” (compound to use when joining steel pipe) and teflon tape. We had to visit two different plumbing supply houses before finding the 1/2″ valves, but S. knew right where to go.

We got the first three valves on without too much trouble, but the other dining room radiator had a slightly offsized nut and a slightly oversized nipple, so instead of heading out to buy a radiator wrench, I cleaned and lubed one of the old 1/2″ valves and just replaced it.

Then S. started refilling the system, and we bled the air from each radiator. Then we turned the system back on, gave it a bit of time to heat up, and bled the remaining air from the radiators.

It was 62 degrees inside when we turned the system back on, and in less than two hours, the house was up to 71 degrees–it felt downright balmy.

M. spent two grueling hours in the basement scrubbing accumulated years of filth and crap out of the radiator covers, and S. and I put them back into place, so we should have a nice warm house this winter.

Bye-bye Peach Tub

Friday, October 15th, 2004

The hall bath on the second floor appears to have been redone in the twenties or thirties, and with the exception of a new toilet, it’s had precious little done to it since then. The walls are covered in green Vitrolite (an art-deco glass panelling), the tub and sink are peach, the toilet is white, and the tiles are different shades of peach.

Well, M. and I decided that the green could stay, but the peach had to go, so today we had the tub re-coated with white porcelain. This is definitely not the kind of work to do yourself, here’s what the recoating guy did:

  • Carefully taped off of the tub’s fixtures and everything around the tub. He taped cups to the tub spigot and shower head to prevent drips
  • Covered most of the bathroom and a fair piece of the hallway in paper.
  • Washed the tub with acid to etch the existing porcelain to allow the new finish to bond tightly with the old one.
  • Sprayed on the new finish.
  • Cleaned up all the mess and left the tape/paper around the edges of the tub for me to take off on Sunday.

Oh, and did I mention how bad it smelled? It’s not quite as bad as the Swedish Finish from when the floors were redone, but it was equally noxious. It looks amazing!