Archive for the 'Restoration' Category

Foaming at the Basement

Wednesday, February 27th, 2008

Our umpteenth winter storm this year prevented the guys from coming yesterday to finish the insulation job, so they came today. The bulk of their time was spent prepping as they covered the basement in plastic sheeting. They applied open cell foam in the basement which is very different from the closed cell foam they put in the attic. The open cell foam is lighter, much, much to cut, tear, fold, spindle, and mutilate. It’s also a lot less sticky–it’s remarkably like angel food cake (no, I didn’t taste it).

They covered the furnace with sheeting, so I turned the heat off and kept an eye on the thermostat to see how the house reacted. Before having the attic insulated, on a day like today (20 degrees out and windy), it would take about 50 minutes for the temperature to go from 66 to 62. In our post-attic-insulated world, it took almost four and a half hours for the first floor temp to drop from 66 to 62, and the second floor thermostat still read 64. When they were done, I turned the heat back on and the house was back to 66 in about 90 minutes.

So clearly you can see why I’m so excited about this whole insulation thing.

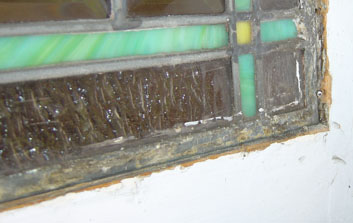
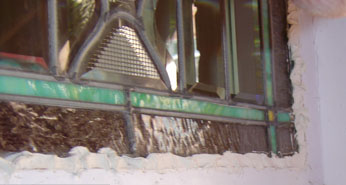
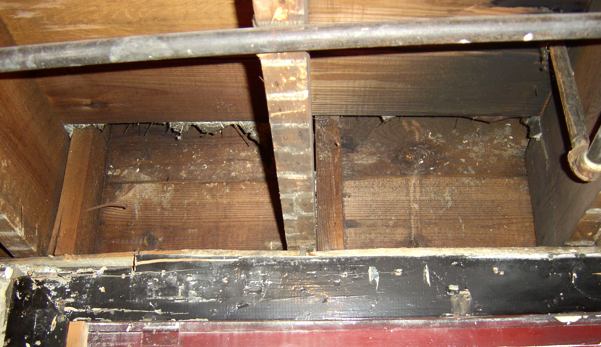
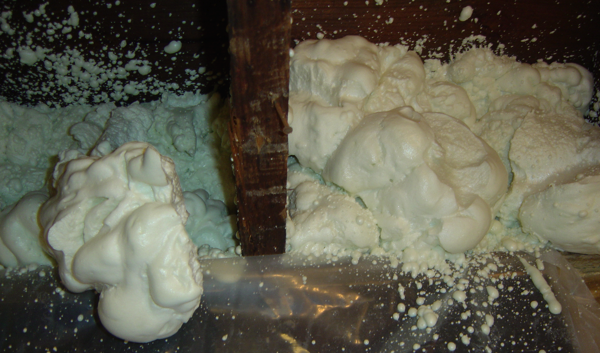
There’s not a whole lot to see with foam injection–just the same wall that was there before, but with holes in it. However, looking up into the balloon framing, you can see the insulation (and lack thereof). Here are some before and after photos:

Before:

After:

I managed to get some really cool video of both the closed-cell foam and the open-cell foam being applied, and I’ll try to post those in the next few days.

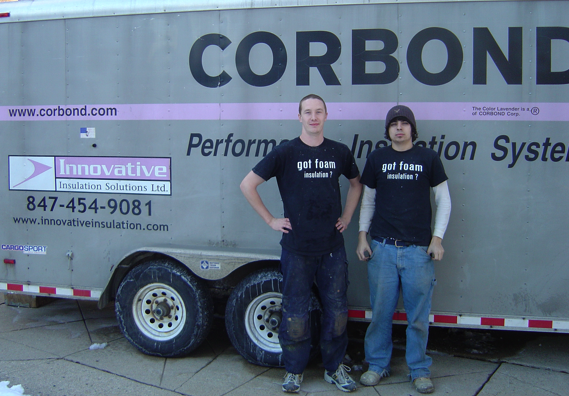
So, after having gotten six separate quotes for fiberglass, cellulose, and foam, I chose Innovative Insulation Solutions to do the job, and I couldn’t be happier with the work they did. Martin and Mike are the guys who did the basement (Martin was one of the four who did the attic), and they all did a fantastic job–they took their work seriously, but were exceptionally friendly and very patiently answered my (many many) questions. There’s nothing better than contractors who are willing to talk to you about what they’re doing to your house. Here are Mike and Martin standing out front after another day in the foam mines:

If you need insulation and you live near area code 847, give Innovative a call.

And the Windows Come Home to Roost

Friday, September 2nd, 2005

Exactly one week to the day after Circle Studios removed our windows, they came back to reinstall them–and they look fabulous!

Here are the windows (except for one casement window which is behind me) all ready to go back in. Note that they’re actually flat now. Who would have thought?


They started by removing the boards, setting the panes back into the frames, and securing them in place with nails.


Once the windows were set back into place, they daubed glazing compound around the perimeter of each window:


And then they smoothed the glazing compound out. Just that easy. I’ll try and get some real “after” pictures when we get a nice sunny day.

Thanks again to Andy and Joseph from Circle Studios. They did a fantastic job and took really good care of our windows–we couldn’t be happier with their work.

Out Come the Windows

Friday, August 26th, 2005

Andy and his assistant came this morning to remove the stained glass windows and board them up. The two casement windows came out easily as they just had to pull the hinge pins, but the other windows took a bit of work.

When removing old (fixed) stained glass windows, you’ve got basically two paths to take: Remove the glass with the frame intact (disassembling some amount of trim in the process), or remove just the windows by chipping out the old glazing and pushing the window out from the inside. Andy decided to take the latter approach with the foyer window and the two living room windows. While it took some effort to chip out all the old glazing, they got the windows out in one piece. The whole removal process took under two hours, but it took them another hour or two to carefully board up the windows and place the storms back in. M. put some old towels under where they were working, so there was hardly anything to cleanup.

Andy’s assistant removed the old glazing from the outside:


After removing the glazing, they were surprised to discover that the nails holding the window in place were square!
Here’s Andy helping to get the window out from the inside by using a putty knife:


And lastly, the sad-looking boarded-up window:


And here’s Andy’s helper removing the glazing from one of the living room windows. You can really see how badly the window is bowing out by looking at the reflections on the different panes of glass.


So off they went with our windows and now we’re looking forward to living in a cave for a week. If all goes well, they’re coming back next Friday to put the windows back in.

Here we go!

Friday, August 19th, 2005

We’ve decided to have Circle Studios repair the stained glass windows. They’re planning on coming next week to take the windows out and board them up. Fingers crossed!

Still Smells

Wednesday, October 6th, 2004

Well, the house still reeks from the Swedish Finish, but that’s mainly because we haven’t had time to go over and air it out properly. M. Got there early after work today, opened up the house and cranked up the attic fan (more on that later), which helped a lot.

We tried a few paint colors in the kitchen/breakfast room and the the powder room. We chose a nice darker blue for the powder room and have decided on a pretty dark red (Some kind of Maple) for the kitchen. Since this side of the house faces West, a dark color should look quite nice.

The Floors are Done.

Monday, October 4th, 2004

John and his father put two coats of semi-gloss finish on the floors today. When they first came over for an estimate, they asked what kind of finish we wanted. Not knowing much of anything about floor finishes, we told them that we wanted the most durable finish possible. They recommended Swedish Finish as the most durable and long-lasting finish that you can put on a wood floor (that isn’t factory applied, that is). Technically speaking, it’s a “Acid-cured Urethane”, and it dries in a few hours, but takes weeks to finish curing and hardening. The real downside, they pointed out, is that it smells quite a bit, so it’s not something you can really use if you’re going to live in the house while the floors are redone. Since we’re not yet living there, we decided to go with the Swedish Finish (instead of Polyurethane).

They put two coats of semi-gloss finish on today, and screened once in-between coats.

And they weren’t kidding about the smell–we could smell it out on the front sidewalk, and it reeked to high heaven. It smells like a cross between rubbing alcohol, sterno, paint thinner and Vics Vapo-Rub. They were just putting the last strokes on the second coat at about 5:30, so we came back at 10:00PM to check it out and close some of the windows.

In short, it’s beautiful–everything that we had hoped for. And without further ado, here’s the finished product:

To see some before and after comparisons, see the comparison pics.

Just Plain Stain

Saturday, October 2nd, 2004

They finished sanding and screening and put the stain on the floors today. It looks pretty nice, but very muted since there’s no shine to it at all (it’s more matte than a matte finish would be since it’s just raw wood). Here’s the master bedroom with just the stain on it:

Monday’s going to be the day for the finish. Woo.

More Sanding, and the winner of the stain contest!

Friday, October 1st, 2004

So, last night we hemmed and hawed and tossed and turned and finally narrowed our choices down to the following stains (Minwax):

  • Golden Oak
  • Ipswich Pine
  • Cherry
  • Golden Pecan

I handed this list to John this morning, and showed him a picture of a beautiful floor that M. and I liked from American Bungalow magazine. He recommended that in addition to the above four, we also try out “Colonial Maple” as that seemed to him to be closest to the floor in question.

While I was at work, they “laid out” samples of the stain directly onto our floor in the living room for us to get a feel for how the different stains look. Here’s what it looked like:

From left to right, these are:

  • Ipswich Pine
  • Golden Oak
  • Cherry
  • Golden Pecan
  • Colonial Maple (Benjamin Moore, not Minwax)

Before seeing the stains on the floor, my favorite was Golden Pecan, with Ipswich Pine as a close contender. M. liked the Golden Oak, with the Ipswich Pine coming in second. But seeing them on the floor, we ruled out Cherry as looking too much like dyed red, and both Ipswich Pine and Golden Pecan as being too light. That left us with the Golden Oak and Colonial Maple. After walking around the stains for a bit, holding lights high and low, and stooping down and standing up, we finally decided that the Colonial Maple brought out the natural coloring of the red oak beautifully (without looking phony or dyed). Here’s a close-up of the winner:

The floors are now almost completely sanded, and they’re about ready to start screening them.