Archive for the 'Basement' Category

Presents from Summer

Saturday, June 11th, 2005

While I was away last week, M. and the Old Man suffered through the hottest (and most humid) five-day stretch we’ve had in two years. And us without our air conditioning yet–they’re starting the install on this Wednesday!

The huge swing in humidity in the house resulted in a goodly amount of condensation on the external walls of our Southeast basement storage room, which is what we use as a pantry for dry goods. In return, the condensation brought with it some nice stinky spots of mold on the bottom 2 inches of the wall and the neighboring 6 inches of floor. Not to be outdone, I ran off to Home Depot and bought a dehumidifier and plopped it in the middle of the storage room. In the first six hours of operation, it sucked three gallons of water out of the basement air. Before the end of the week I’m going to run out and get a cheap garden hose to allow it to empty right into the basement floor drain. One problem solved, one to go.

The other present we got was that the dining room ceiling started to flake. I could tell that it had been skim-coated by the previous owner, but something mustn’t have been done correctly because I can see little quarter-sized cracks forming on various parts of the ceiling. I don’t think it will start falling off the ceiling for a few months, but only time will tell. I’m not sure (aside from re-plastering the ceiling) what we’re going to do about this, but for now, I’m doing my best to convince the paint to hold on for another year or two.

The AC, once installed, should help keep the humidity level in the house low, and I’m hoping that that will make the Old Man much happier with our summers. Is the AC installed yet?

Benched

Saturday, March 26th, 2005

I’m almost done with my workbench made from the bowling lane. I still need to attach the “skirts” for the top, install the bottom shelf (3/4″ plywood), plane the top, and sand and finish it, but it’s usable as it stands. Most important for me, it’s rock solid and doesn’t so much as budge when you’re working on it. I guess that’s what 300 pounds of wood, a pint of glue, and a whole bunch of 4 inch bolts get you.

Rewired

Thursday, March 24th, 2005

It took the three of us a total of six days, but the basement, and a good chunk of the first floor are now rewired. We pulled out *all* the old wiring in the basement and installed almost 300 feet of new (EMT) conduit. Despite my getting a horrible cold the second day in, we’re done.

We now have 5 new circuits:

  • Circuit 1 (20A): Rear basement lighting, plus two outlets
  • Circuit 2 (20A): Front basement lighting, plus 4 shop outlets
  • Circuit 3 (20A): 4 outlets in the shop
  • Circuit 4 (15A): Everything on the first floor that used to be on the basement circuit, including the sun room, living room outlets, the foyer, the front porch, and the second floor hallway.
  • Circuit 5 (15A): The sunroom, the backyard outside outlets, and the garage.


Other highlights:

  • The original house wiring is actually in pretty good shape, but it was the hundreds of feet of armored cable that took a lot of work.
  • We put the dining room sconces on the dining room circuit instead of the basement circuit.
  • The old circuit box, which was a total mess, is now half-empty.
  • We found a box almost completely buried in the original wall of the basement. Tsk tsk. (That’s the “before/during/after” picture).
  • The old basement breaker has been completely disconnected.
  • The blank plate in the side of the stairs in the foyer, which housed an empty electrical box that was hooked to nothing, is now the proud home of a brand new 20A socket.
  • The outlet in the dining room, which housed a loosely attached non-functioning outlet with a huge burn mark on one of the grounding holes, has been replaced.
  • We had to demolish a *lot* of stuff: The old basement bathroom ceiling, part of the cinderblock wall in a few places, bits of the original plaster wall in other places. Messy, messy, messy, but I can’t wait to get rid of the rest of the cinderblock.
  • We made a total of nine trips to the Home Depot and the electrical supply house.

Some things that I learned:

  • Always remove the hot wire before the neutral, and connect the neutral before the hot. The neutral wire is your friend.
  • After you throw the breaker, it really pays to make absolutely certain that every wire in the box that you’re working on is dead, or you might wind up dead yourself. One of those pen current detectors (that works right through the insulation) is an invaluable tool.
  • 12 gauge stranded wire is a lot easier to work with than 12 gauge solid wire.
  • When the previous electrician doesn’t tape around the sides of a light switch, you get a lot of sparks when it touches the side of the box as you pull it out.
  • Taping around the sides of light switches and outlets is The Right Thing To Do.
  • Making complex bends in electrical conduit is a pain in the ass.
  • The Gold-Fish is the coolest fish tape ever.
  • If at first you don’t succeed, use a bigger wire nut.
  • Electrical work isn’t as scary as I thought it was, but having patience, taking your time, and having a healthy fear of it don’t hurt.
  • When in doubt, use your multimeter.

The Basement Wiring

Sunday, March 13th, 2005

Aside from a few outlets with reversed polarity, The Old Man passed the electrical part of our home inspection with flying colors.

Then, I tore out the basement ceiling and discovered some bits that weren’t up to code:

and this:

Scary stuff, but liveable until we can get some electricians in–at least it’s not knob and tube.

Before moving in, while using the Shop Vac to clean out the basement, I blew a breaker and only then did I discover that the entire basement was on a single circuit. Again, annoying, but liveable until we can get some electricians in.

After moving in and plugging in a few lamps, the TV, the stereo, etc., we discovered that not only is the entire basement on a single circuit, but that same circuit also feeds the living room, the sun room, the breakfast room, the foyer, and the front porch.

So, on a single 15 amp circuit, we have:

  • First basement flourescent light
  • Second basement flourescent light
  • Third basement flourescent light
  • Fourth basement flourescent light
  • Basement stairwell light (top)
  • Basement stairwell light (bottom)
  • North basement storage room light
  • South basement storage room light
  • West basement closet light
  • East basement area light
  • Basement Light near water heater
  • Basement Light near washer/dryer
  • Basement Light near furnace
  • Basement Light near workbench
  • Old basement shower light
  • Old basement bathroom light
  • South basement outlet
  • North basement outlet
  • First sunroom outlet
  • Second sunroom outlet
  • Third sunroom outlet
  • First Living Room outlet
  • Second Living Room outlet
  • Third Living Room outlet
  • Fourth Living Room outlet
  • Living Room ceiling fan and light
  • First breakfast room outlet
  • Second breakfast room outlet
  • Backyard outlet (outside)
  • Garage outlet (outside)
  • Garage outlet (inside)
  • Garage yard lights (outside)
  • Garage wall light (inside)
  • Foyer light
  • Front porch light

Now I don’t know if you’ve been counting or not, but that’s a grand total of 21 light fixtures and 14 outlets on a single 15 amp circuit. Now I’m no electrician, but that seems a little excessive to me.

Thankfully, tomorrow, our nephew S. and his friend M., who is an electrician, are coming over to start rewiring the basement (And I’m going to help out-at least until they throw me out). Not only are they going to replace all the wiring in the basement, but they’re also going to divide up the 35 endpoints above across 4 or 5 circuits. I’m really looking forward to this!

And now, a gratuitous shot of the old electrical fusebox, which was turned into a giant junction box by a previous electrician:

My favorite part is the coax for the cable TV that comes in through the hole in the wall where the electrical service used to enter the house–that’s classy.

Not a Typewriter

Thursday, February 24th, 2005

When I ripped out a framed wall in the basement, I found a porcelain fixture on the wall. This is what it looks like, front and back:

The wires had already been cut, although there are three wires hooked to the top (I’m assuming that one is a ground) and two wires hooked to the bottom. The reddish “bars,” which are hollow, but with something inside of them, appear to conduct current from the top wires to the bottom (or vice-versa).

Right above the circular part (which is threaded), you can barely make out the words “Western Electric” raised on the porcelain.

The back side seems to have an “E” shaped depression and two other square depressions that are filled with a waxy substance.

And now for the thirty-seven dollar question:

Just what in the heck is this? Anyone? Anyone? Bueller?

Rumors of My Sanity Have Been Greatly Exaggerated

Monday, February 21st, 2005

In the interest of putting to rest any rumors that I’m a sane man, this weekend, I bought a bowling lane.

Well, not a whole bowling lane, but a part of a bowling lane. Allow me to ‘splain:

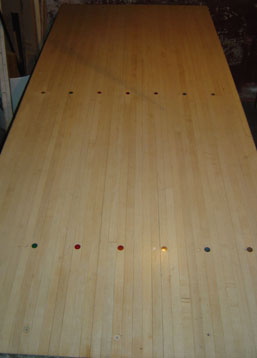
I found an ad on craigslist a few weeks ago from a guy who is losing his storage space and needed to sell 8 and 16 foot sections of bowling lanes, for $10 a lineal foot. These lanes are 2.5″ thick, 42″ wide, and made out of hard maple, so that’s $10 for 3.5 square feet of rather substantial maple–an amazing price for something that’s a) usually very expensive b) somewhat difficult to find, and c) extremely heavy. Heck, they don’t even use real wood in new bowling alleys anymore (they use a [much cheaper] composite).

These particular lanes were salvaged from Marigold Bowl, a 32 lane bowling alley that opened in the early 1940’s a few blocks from The Friendly Confines of Wrigley Field. Unfortunately, the recent rise in popularity of the neighborhood caused a corresponding rise in property taxes which forced the owners to close the alley in May of 2004. It came as no surprise to me that the site was sold to a developer who is going to build more “luxury loft condominiums”. Some progress, huh?

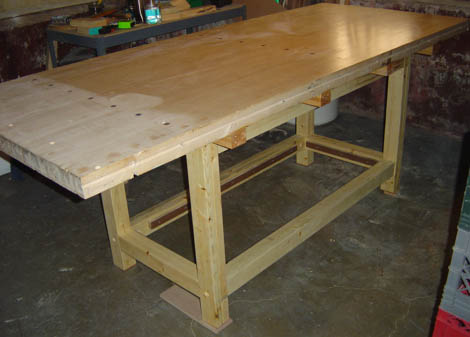
So why would I want a section of an old bowling lane? Well, I wanted to use it as the top of a workbench in my basement work area. A friend of mine, who is also one of my remote woodworking mentors (i.e. I pester him on AIM every night with woodworking questions), built a workbench for himself out of a section of bowling lane. Not only is it a beautiful workbench, but it’s incredibly durable and sturdy. I often dreamed of having a similar workbench, but figured I’d most likely wind up settling for a bench with a plywood top.

So, having found a place to buy the lane, I had to get the lane itself back to the house. After pestering a few (very busy) friends who had pickup trucks, I finally called our nephew S., whose friend has a huge conversion van. S. and his friend agreed to lend me a hand, so they came over on Saturday morning and we headed out to an industrial section of the city to pick up the lane.

Now, the aforementioned mentor warned me that a section of bowling lane is heavy–to the tune of 200-300 pounds. I mentally stacked 3 sheets of 3/4″ plywood in my head and assumed that he was exaggerating somewhat.

He wasn’t exaggerating. Not even a little.

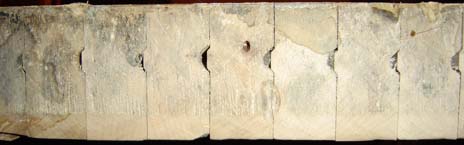
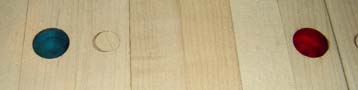
We met the seller in an old city warehouse that had over 100 16′ sections of lane stacked inside. While I really wanted a section of lane with the old lane markers on it, in the alley, those sections are right next to the “splice” (where the maple boards were spliced with (cheaper) fir boards), and the sections in the warehouse were in bad shape, so we just took a section of maple that was already cut to an 8′ length.

When I say “took”, I’m glossing over the sisyphean struggle it took for us to get the section into the van. This piece of wood weighed so much that the four of us had to slide it over and into the van instead of picking it up and placing it in the van. In the hopes of using some of this wood for a countertop, cutting board, table, go board, or something similar, I went a little overboard and bought two more sections.

Yes, I am out of my mind.

When we got back to the Old Man, we muscled one section into the basement by rolling it on small pieces of pipe, thumping it down the concrete steps (Rattling both the kitchen table and M.’s nerves).

Once inside the basement, we (meaning “mostly S. and his friend”) hoisted it onto a temporary base made out of a heavy-duty wire rack (rated to 500 pounds) and some milk crates. We then placed the other two sections against the back wall of the garage for later use, providing the garage doesn’t fall over first.

Today, I ran over to Lee Lumber (Another great recommendation from House in Progress) and picked up 15 pine 2x4s. Using some plans from an old Woodsmith magazine as a guide, I’m going to glue them up into 4x4s to make a sturdy base for my bench. Stay tuned for more insanity!

Plumbing the Depths

Tuesday, September 28th, 2004

This morning, The Plumber came to take a look at our catchbasin and sewer infrastructure. He referred us to another company who can come and pump out the catchbasin (’cause who knows what’s in there), and went into the basement to take a look at our sewer line.

When our inspector went into our basement, he spotted a small (12″ x 14″) steel trap door which was painted shut and remarked that “It looks like you’ve got an FCS, but it’s not working. I found out that FCS stands for “Flood Control System” which I suppose would have been nice to have working, I guess.

Well, The Plumber tried to crowbar this door open, unsuccessfully, so went back to his truck and came back with a 5 pound maul and started banging on that door like it had run over his dog. Eventually, the door loosened up, and he pulled it open to discover what I thought was just a bunch of dirt

He scraped away the dirt to find the end of a piece of 6″ ceramic sewer pipe with some sort of plug in it. When he pulled the plug out, I looked down about 4 feet of pipe to see the main sewer line that goes from the catch basin (behind the house) to the city sewer under the street. No FCS anywhere in sight… just an access pipe to the sewer. Real exciting stuff, I know, but it was all new to me as I had no clue that anything was going on that far under my basement.

So The Plumber got his sewer rodding machine out and rodded out the sewers, sending a 4″ cutter back to the catch basin, and a 6″ cutter out to the city sewer, pulling back several handfuls of tree roots that had found their way into the pipe junctions at several places.

So we’ve got a clean sewer now. Isn’t that exciting? I think so too.

Basement Liberation

Saturday, September 25th, 2004

The first time I saw the Old Man, I went inside the basement, took one look at the half-broken drop ceiling in there and realized that it had to go.

It’s the standard 12″ x 12″ cardboard-type acoustic tiles, and the front half of the basement (the “Concrete Block Room”) was covered with them, with the exception of a few spots where they had been torn out to run new plumbing lines.

This left us with about 6’8″ of height in the basement, with the exception being the steel i-beam that runs from the front to the back of the house… the bottom of the beam is only about 6’6″ from the floor.

Above the tiles were furring strips. Above those furring strips were more furring strips, and on one side of the basement, even *more* furring strips… but I’m getting ahead of myself.

I went and picked up my nephew, S., to help me out. We got to the house and went straight to work in the basement. We each took a hammer and a wrecking bar and made short work of the furring strips in the front of the basement. Granted, we were slowed down by the fact that the furring strips were 32″ or shorter, and each strip was held in place with anywhere from 3 to 8 nails.

In the end we were left with a 5′ high pile of furring strips (with lots of nails sticking out) and some very sore arms (at least my arms were sore… S. seemed just fine)

It turned out that under all of those tiles and furring strips were some *gorgeous* rafters. We’ve got 24′ 2×10’s, and since they’ve been covered by a ceiling pretty much since the house was built, they look brand new and don’t exhibit any of the oxidizing that you’d expect to see in a 92 year old house. At some point in the distant past, there was a plaster ceiling, as the bottoms of the rafters exhibit the tell-tale white lines running across them:

Anyway, I’ll try and remember to take an “after” photo, but for now, here’s a “before” photo

and a “during” photo

In the back of the basement, only about 1/4 of the ceiling had tiles left, and instead of furring strips, they used 1×6’s, so it only took about 20 minutes to tear all that out. However, it took quite a boring while to bend nails into the furring strips and stuff them into garbage cans–we got about 2/3 of the strips disposed of.