Archive for February, 2005

Not a Typewriter

Thursday, February 24th, 2005

When I ripped out a framed wall in the basement, I found a porcelain fixture on the wall. This is what it looks like, front and back:

The wires had already been cut, although there are three wires hooked to the top (I’m assuming that one is a ground) and two wires hooked to the bottom. The reddish “bars,” which are hollow, but with something inside of them, appear to conduct current from the top wires to the bottom (or vice-versa).

Right above the circular part (which is threaded), you can barely make out the words “Western Electric” raised on the porcelain.

The back side seems to have an “E” shaped depression and two other square depressions that are filled with a waxy substance.

And now for the thirty-seven dollar question:

Just what in the heck is this? Anyone? Anyone? Bueller?

Rumors of My Sanity Have Been Greatly Exaggerated

Monday, February 21st, 2005

In the interest of putting to rest any rumors that I’m a sane man, this weekend, I bought a bowling lane.

Well, not a whole bowling lane, but a part of a bowling lane. Allow me to ‘splain:

I found an ad on craigslist a few weeks ago from a guy who is losing his storage space and needed to sell 8 and 16 foot sections of bowling lanes, for $10 a lineal foot. These lanes are 2.5″ thick, 42″ wide, and made out of hard maple, so that’s $10 for 3.5 square feet of rather substantial maple–an amazing price for something that’s a) usually very expensive b) somewhat difficult to find, and c) extremely heavy. Heck, they don’t even use real wood in new bowling alleys anymore (they use a [much cheaper] composite).
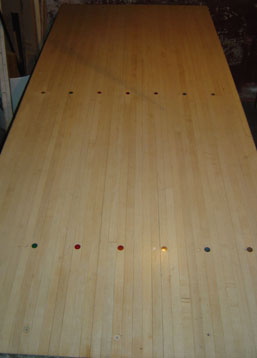
These particular lanes were salvaged from Marigold Bowl, a 32 lane bowling alley that opened in the early 1940’s a few blocks from The Friendly Confines of Wrigley Field. Unfortunately, the recent rise in popularity of the neighborhood caused a corresponding rise in property taxes which forced the owners to close the alley in May of 2004. It came as no surprise to me that the site was sold to a developer who is going to build more “luxury loft condominiums”. Some progress, huh?

So why would I want a section of an old bowling lane? Well, I wanted to use it as the top of a workbench in my basement work area. A friend of mine, who is also one of my remote woodworking mentors (i.e. I pester him on AIM every night with woodworking questions), built a workbench for himself out of a section of bowling lane. Not only is it a beautiful workbench, but it’s incredibly durable and sturdy. I often dreamed of having a similar workbench, but figured I’d most likely wind up settling for a bench with a plywood top.

So, having found a place to buy the lane, I had to get the lane itself back to the house. After pestering a few (very busy) friends who had pickup trucks, I finally called our nephew S., whose friend has a huge conversion van. S. and his friend agreed to lend me a hand, so they came over on Saturday morning and we headed out to an industrial section of the city to pick up the lane.

Now, the aforementioned mentor warned me that a section of bowling lane is heavy–to the tune of 200-300 pounds. I mentally stacked 3 sheets of 3/4″ plywood in my head and assumed that he was exaggerating somewhat.

He wasn’t exaggerating. Not even a little.

We met the seller in an old city warehouse that had over 100 16′ sections of lane stacked inside. While I really wanted a section of lane with the old lane markers on it, in the alley, those sections are right next to the “splice” (where the maple boards were spliced with (cheaper) fir boards), and the sections in the warehouse were in bad shape, so we just took a section of maple that was already cut to an 8′ length.

When I say “took”, I’m glossing over the sisyphean struggle it took for us to get the section into the van. This piece of wood weighed so much that the four of us had to slide it over and into the van instead of picking it up and placing it in the van. In the hopes of using some of this wood for a countertop, cutting board, table, go board, or something similar, I went a little overboard and bought two more sections.

Yes, I am out of my mind.

When we got back to the Old Man, we muscled one section into the basement by rolling it on small pieces of pipe, thumping it down the concrete steps (Rattling both the kitchen table and M.’s nerves).

Once inside the basement, we (meaning “mostly S. and his friend”) hoisted it onto a temporary base made out of a heavy-duty wire rack (rated to 500 pounds) and some milk crates. We then placed the other two sections against the back wall of the garage for later use, providing the garage doesn’t fall over first.

Today, I ran over to Lee Lumber (Another great recommendation from House in Progress) and picked up 15 pine 2x4s. Using some plans from an old Woodsmith magazine as a guide, I’m going to glue them up into 4x4s to make a sturdy base for my bench. Stay tuned for more insanity!

The Woodwork

Wednesday, February 16th, 2005

One of the first thing we noticed when we saw the Old Man was the woodwork–it’s beautiful, or at least it was at some point. The entire house is finished with heavy oak trim, and the dining room has oak panelling from the floor to about 18″ below the ceiling. The foyer stairs and the upstairs hallway are also panelled to about waist high (undecorated panels, not actual wainscoting).

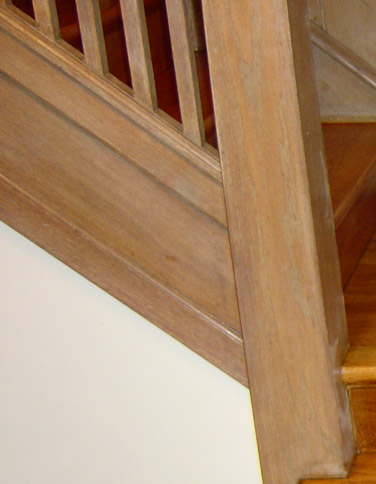
This woodwork should provide warmth and beauty to the house, but it doesn’t; this picture of the stair railing gives a good idea of what it looks like now.

From what I can tell, one of the Previous Owners painted the woodwork–all of it–with at least one coat of paint, which was very common after WWII. The crown molding (a very simple molding, mind you) is still painted ceiling white. Then another Previous Owner stripped the woodwork, but did an extremely poor job of it:

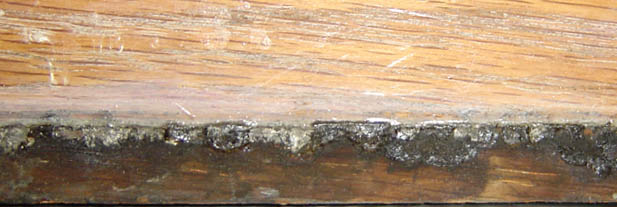
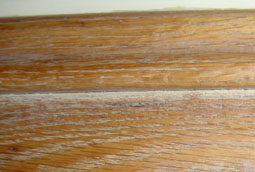
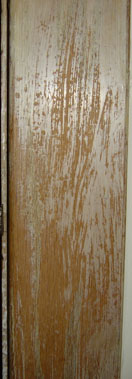
They neither removed the shoe between the floor and the trim, they didn’t remove all the stripped finish, and they failed to completely put a new finish on the trim after they stripped it. In fact, if you look at where I removed the shoe, you can see where the old finish pooled up and hardened into a glass-like substance. The result: woodwork with an inconsistent “pickled” finish, raised grain, and the look of weathered driftwood.

So I’ve been doing research to figure out what we’re going to want to do with the wood. We bought a few paint strippers to try out on some test patches. We’re going with ReadiStrip, and CitriStrip for starters, and we’ll try SOYGel if neither of those do the trick.

As for refinishing, we’d like to go with a darker finish to provide a contrast with the floors, which were stained with Colonial Maple. However, we don’t want the finish to look muddy, or plasticky–we want it to look like it was finished 93 years ago and meticulously maintained for the life of the home.

Let’s start with what I’ve ruled out:

Several people recommended that we just use Minwax Polyshades, which apply a stain and a finish in one step. It may be easy to use, but wherever I’ve seen it used, it not only obscures the grain of the wood, but scratches easily, and the scratches stand out because the stain and the finish scratch off together.

I’ve also ruled out polyurethane, because of its plasticky look.

I’m looking for a finish that will highlight the beauty of the wood and give it a nice warm deep glow. At the same time, I’m looking for a stain that will highlight the grain of the wood while darkening the body of the wood without completely blackening it.

So far, all of my research indicates that I’ll want to start with a dye stain, apply a pigment stain over that, and finish with a few coats of shellac followed by a microcrystalline wax.

That sounds like a lot of work.

I’m planning on doing some experimentation on some test pieces of wood before actually trying it on the actual woodwork, but I’m hoping to find the look that I want without too many failed attempts.

This Old Book

Monday, February 14th, 2005

M. and I are presently working our way through Renovating Old Houses by George Nash, which we bought after reading House In Progress’s Review. It’s a great reference book to have, and provides a lot of the breadth that you can’t quite get from hours of Googling.

I’m really glad that we got this book before moving ahead with some of the major projects we’re thinking of–I suspect that it will not only help us make better decisions, but it will also provide some reassurance that we’re making the right decisions for us and for the Old Man.

Insulation? What Insulation?

Sunday, February 13th, 2005

While it’s no surprise to many that old houses were built with no insulation, it was still a rather large surprise to me a few weeks ago when I learned that the old man in indeed one of those old houses that has NO INSULATION. Mind you, the day that I discovered this, it was a balmy 3 degrees (Fahrenheit) outside, and we had just gotten a gas bill that looked more like a mortgage payment than a utility bill.

Truth be told, we do have a little insulation in the attic floor, but it’s loose fill–ancient, thin, and without a vapor barrier. I’m guessing that it’s giving us a net R value of about 3, and that’s being generous. Of course, in our neck of the woods, they recommend an R value of 38 in the attic.

A little investigation and research revealed that the old man is built using a framing technique called “balloon framing.” Google found me the following definition of balloon framing:

Balloon framing is a system of wood-frame construction, first used in the 19th century, in which the studs are continuous from the foundation sill to the top wall plate. Floor structures (one, two, or more) are hung from the studs. Balloon framing, which replaced post-and-beam construction, was made possible by the availability of structural lumber sawed to uniform sizes.

A balloon frame, which is held together entirely by nails, could be erected faster than a post-and-beam frame, with the use of less-skilled labor; and the end result was stronger and more apt to be square and plumb. Balloon frames have one serious drawback: unless firestops are installed at the level of every floor, the stud spaces form what are essentially chimneys from cellar to attic, greatly accelerating the spread of fire.

(More on balloon framing, along with some pretty pictures here)

And indeed, our home has no firestops in the stud spaces at the basement ceiling, so in addition to insulating the old man, we also need to install firestops. Installing the firestops in the basement shouldn’t be hard, but if we’re supposed to put them between the 1st and 2nd floor, we’re going to have a problem on our hands since we don’t plan on ripping out the original plaster walls (although we are planning on sprucing them up a bit).

Two more items for the large project TODO list.

Go with the Flow

Wednesday, February 9th, 2005

In the I Can’t Believe I Didn’t Figure This Out Earlier department, we can now do a load of wash in under an hour.

When M. did her first load of wash in the house, she called me down to take a look at how slowly the washer filled–the water was just dribbling into the washer. I checked both valves for the hoses leading to the washer, and they were completely open, so I shrugged and figured that the steel pipes that feed the washer were clogged from 92 years of buildup (from what I’ve read, steel pipe has a projected lifespan of 40 years).

For the past few months, M. has worked around this problem by just waiting at least an hour before going back down to move the load into the dryer. And when I did laundry last week, I just headed back upstairs and worked for a while before returning to the wash–no big deal.

So I’m unable to explain to you why I got a bee in my bonnet about this last night. I was in the basement waiting for the glue to dry on some shelves that I was building and I could just hear the washer calling to me, so I grabbed my channel locks and headed over to see what I could find out. First, I detached the hoses from the back on the washer and cleaned out the tiny stainless steel filters just inside of the washer connects, even though they weren’t very dirty. This made no difference in the fill rate of the washer, so I reattached the hoses and went back to gluing.

Washer: 2. Me: 0.

After a bit of a rest, I realized that it wouldn’t hurt to examine the end of the hoses that attached to the faucet, so I unscrewed it and looked into the end of the hose to discover another filter, and this one was almost completely blocked with calcium and rust buildup. Rinsing didn’t help, but soaking the ends in CLR for a few minutes did the trick! The flow was still slightly impeded, but since the hoses were ancient, rubber, and not burst-proof, I picked up two new ones from Home Depot and now the washer fills in under five minutes.

Washer: 0. Me: 1.

Flying High with Seal ‘N’ Peel

Tuesday, February 1st, 2005

I’m sure it comes as no surprise to you that the Old Man has old windows. The old windows have old storm windows on them, and, even with the old storms in, some of the old windows let way too much of the good old outdoors in.

While our furnace and radiators are more than capable of keeping the house warm, after getting our first “wintertime” gas bill, I decided that it’s time to deal with some of our energy efficiency issues.

The sun room on the front of the house seems to be the worst culprit, with 7 huge windows, one of which might as well be wide open for all the air it leaks into the house. The sun room was originally an external porch and closed in at a later date, so the windows aren’t original to the house, and I figured that this was a safe enough place to begin weatherproofing.

I did a little research on various ways of temporarily sealing air leaks and found that there are basically two solutions available. First, you can cover your window with a plastic film (either inside or out) taped to the frame and shrunk to fit with a hair dryer. Second, you can apply some sort of temporary caulk where the window meets the frame (and anywhere else that air is coming in or out). One type of caulk comes in premade strips and is pressed into place, and the second kind comes in a standard caulk tube and is designed to be removable.

Since I’ve now got mad caulking skillz,I decided to try using DAP Seal ‘N’ Peel. I cleaned the window frames in the sun room and started caulking the worst of the windows, figuring that I’d just keep caulking until I emptied the tube. I managed to finish 5 windows and I can already feel the difference in heat loss.

But there’s one small problem: The warning label on the caulk said that it contains “Lactol Spirits, Mineral Oil, and Toluene” and that I should make sure that I’m working in a well-ventilated environment.

Well, that’s all well and good except for the fact that 1. I JUST CAULKED MY WINDOWS SHUT, and 2. it’s 30 DEGREES OUTSIDE. The house currently reeks to high heaven, and my only recourse is pretty much to put on a coat and leave the front door open for a while. So the downside is that my brain is probably being eaten away by this stuff, but hey, at least I’m high as a kite!